



How to Replace IVG Pro Refills: A Simple Step-by-Step Guide
One of the biggest advantages of using the IVG Pro Prefilled Pod Kit is how straightforward it is to keep the device going. Once you've used your first refill, replacing it quickly becomes part of your routine and takes only a few moments.
If you're moving over from disposable vapes, you'll probably find the process refreshingly familiar. There are no bottles of e-liquid to carry, no messy refilling and no separate coils to install. Instead, you simply remove the used refill, fit a new one and continue using the same rechargeable device.
If you're completely new to the system, it's worth understanding How IVG Pro Refills work before replacing your first refill. Our guide explains how the 2ml pod and 10ml refill container work together to keep e-liquid flowing automatically throughout the life of the refill.
Although it's a simple process, there are a few small things worth knowing before you install a replacement. Taking a couple of extra minutes can help you get the best flavour from the first puff and reduce the chance of avoidable problems.
Before You Fit a New Refill
Before opening a fresh IVG Pro refill, make sure your current one has genuinely reached the end of its life. A noticeable drop in flavour, weaker vapour production or an empty refill reservoir are usually the clearest signs that it's time for a replacement.
It's also worth checking that you've purchased the correct refill for your device. IVG produces several vape ranges, and replacement pods aren't universal across every model. Taking a moment to confirm compatibility before opening the packaging can save unnecessary frustration later.
Finally, have a quick look at the battery level on your device. Installing a brand-new refill into a battery that's almost flat can make it difficult to judge whether everything has been fitted correctly. Starting with a charged device makes the first few puffs much more representative of how the refill is designed to perform.
Removing the Used Refill
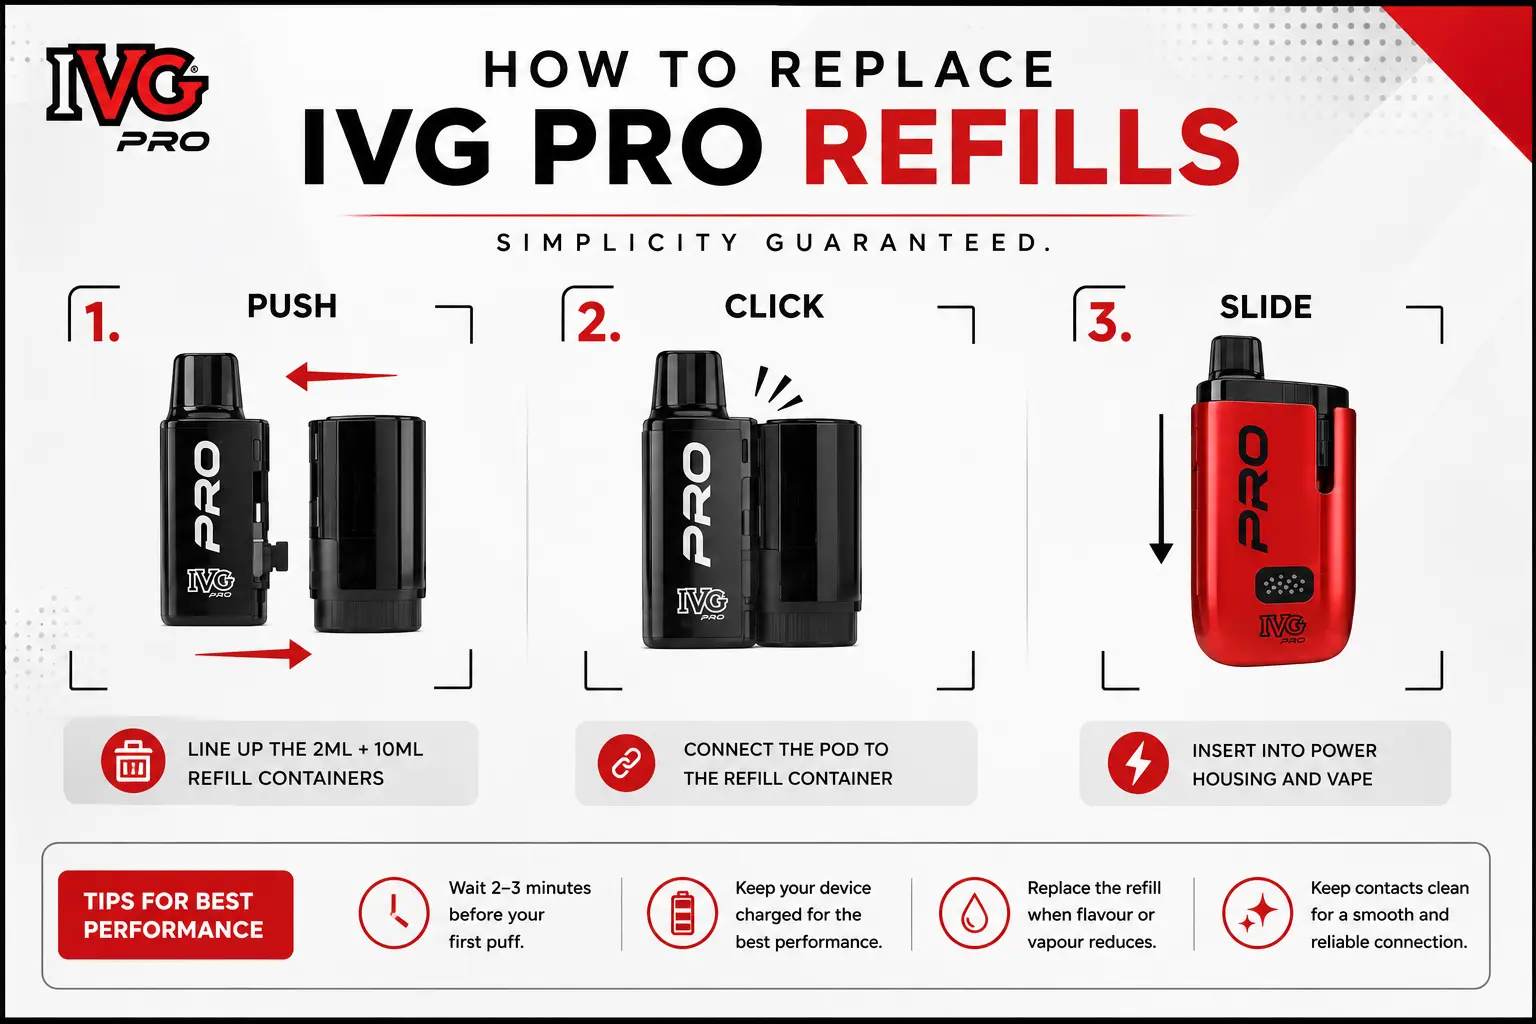
Taking out the old refill doesn't require any tools or excessive force. Grip the refill securely and remove it from the device using a steady motion. If it doesn't come away immediately, avoid twisting or pulling aggressively, as everything has been designed to separate easily when handled correctly.
Once the refill has been removed, it's worth taking a quick look inside the pod chamber. This isn't something you need to do every time, but if you've been carrying the device in your pocket or bag, it's possible for small amounts of dust or lint to collect around the connection points.
A quick wipe with a clean, dry cloth is usually all that's needed. Keeping the contacts clean helps maintain a reliable connection between the battery and the refill, which can contribute to consistent performance over time.
Preparing the New Refill
Before fitting the replacement, remove it from its packaging and check for any protective seals or plugs. These are included to keep the refill sealed during transport, but they must be removed before the device can work correctly.
It's an easy step to overlook, particularly if it's your first time using the IVG Pro system. If a new refill doesn't appear to be working straight away, the packaging is often the first thing worth checking.
Taking a few seconds to inspect the refill before installation can prevent unnecessary troubleshooting later on.
Installing the New Refill
Once the refill has been prepared, align it with the opening in the device and press it gently into position. It should sit securely without needing to be forced, and once fitted correctly it should feel stable inside the device.
Although it can be tempting to start vaping immediately, allowing the refill to sit for two or three minutes is good practice. This gives the e-liquid enough time to fully saturate the mesh coil before it's heated for the first time.
Waiting those few minutes may seem like a small detail, but it can help deliver better flavour from the outset and reduce the risk of the coil heating before it's properly supplied with e-liquid.
Your First Few Puffs
The IVG Pro is inhale activated, so once the refill has been installed there's nothing else to configure. Simply inhale as you normally would and the device will activate automatically.
The first couple of draws may feel slightly different to the rest of the refill's lifespan as the coil settles into normal use. This is perfectly normal and shouldn't be a cause for concern. After those initial puffs, flavour and vapour production should become consistent.
If the device doesn't activate at all, double-check that the refill is fully seated and that any protective packaging has been removed before assuming there's a fault.
A Few Common Mistakes to Avoid
Most issues with new refills are caused by small oversights rather than faults with the product itself.
Trying to use the refill immediately after installation, forgetting to remove protective seals or continuing to vape after the refill has been exhausted are among the most common examples. Fortunately, they're also some of the easiest problems to avoid.
Taking a little extra care during installation helps ensure the refill performs as intended from the very first puff and continues to deliver consistent flavour throughout its lifespan.
Final Thoughts
Replacing an IVG Pro Refill is designed to be simple enough for everyday use, even if you've never used a rechargeable pod system before. Once you've done it once or twice, the process becomes second nature and takes very little time.
By fitting the refill carefully, allowing the coil a few moments to absorb e-liquid and keeping the device clean, you can enjoy the smooth performance the IVG Pro system has been designed to deliver.
Frequently Asked Questions
Replace the refill once the e-liquid has been used or when flavour and vapour production noticeably decline.